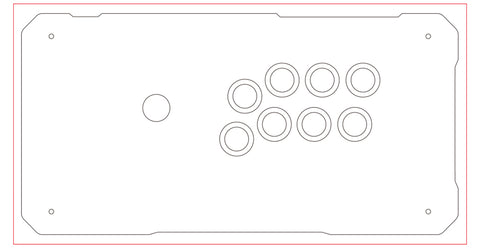
You must create the artwork data yourself using the template.
Acrylic top is required for artwork replacement.
This arcade controller was not originally designed with interchangeable artwork.
The artwork alone is not available for use. This item must be purchased at the same time.
If you already have an acrylic top from another store, you do not need to purchase this item.
High-resolution, high-definition prints
Artwork prints are printed using top-of-the-line professional printers.
They provide vibrant, professional-quality artwork reproductions.
The printer is capable of 1,440 dpi resolution and uses a 9-color pigmented ink system.
This duplicates artwork with amazingly smooth tonal rendition.
Each print is laser cut to the optionally selected specifications and
Receive prints that come with button insert cuts designed to fit your selected brand.
Ordering Notes
When submitting artwork, do not set the template color space to CMYK.
The template is set to RGB, so please leave it as it is.
Changing to CMYK may result in colors that are printed differently than expected.
Designed for Qanba Obsidian2 Leverless
This product is designed exclusively for the Qanba Obsidian HitBox.
Not sold in Japan.
Please use the template below to create your artwork.
Qanba Obsidian2 Leverless Template
Please be sure to read the template guide.
Note: If you use a template other than the one provided, you may not get the results you expect.
Describes the options for ordering artwork.
Insert cut or not

This is the choice of whether or not the red portion of the image needs to be cut.
Even if "NO" is selected, the button insertion hole itself will be cut.
This question asks if the inside of the button should be cut out.
If you do not need it, please select NO, in which case the insert cutout will not be included in the product.
This option is to reduce the burden on our work staff.
If you select "YES," please select the manufacturer of the button you wish to use next.
It will be optimized for the selected manufacturer.
Uploading Artwork
Upload the artwork file created using the template.
The maximum file size that can be uploaded is 200 MB.
Supported file formats are PSD (recommended), PNG, TIFF, PDF, and JPG.
Do you drill screw holes for ○○?
This option exists only for some artwork prints.
If it is the default selection, it will remain the default (manufacturer standard).
If you wish to change it, select "NO".
About Paper
Matte paper is selected as standard.
Paper specifications are as follows.
Matte paper
Base: Specialty paper Thickness: 220µm Surface: Matte Whiteness: 93
High whiteness exclusive paper with firm thickness
Semi-gloss paper
Base: Photographic paper Thickness: 295µm Surface: Semi-gloss Whiteness: 100
Thick, high whiteness photographic paper base

This is a note for uploading artwork templates.
First, please DL the template you wish to use.
It is in a zip file, so unzip it and you will find a PSD file.
To open the PSD file, use Photoshop or Photopea to open PSD files.
When you open the PSD, you will see the following

The red frame is the overprint area.
The black line is the line to be cut.
To print and cut, the image must be filled up to the red line.
If the black line is not exactly filled in, the image will not be visible because of slight misalignment during cutting and printing.
The following examples are bad examples.

The top and bottom are filled in to Oveprint, but
This may result in a blank space when cutting.
A correct example is shown below.

Everything up to the red line on the OverPrint layer is filled.
If you are uploading in PSD, please save and upload in this state.
For non-PSD users
Basically, PSD is recommended.
Basically the same as up to the above, but
When saving, delete the following layers.
Oveprint, Guide (if any), Layout, delete these layers, erase the border, and save the file.
An example of saving is shown below.

That is all.
Basically, please upload your work in PSD format so that we can easily check the finished product.

